Module not specified Android Studio, a common frustration for developers, often signals a hitch in the project’s machinery. This comprehensive guide delves into the root causes, troubleshooting steps, and even some advanced scenarios, empowering you to swiftly resolve this error and get your app back on track.
The “module not specified” error, while seemingly straightforward, can stem from a multitude of issues, from simple configuration problems to intricate dependency conflicts. Understanding these underlying causes is key to effective troubleshooting. This guide meticulously examines these complexities, providing clear solutions and practical examples.
Error Description and Symptoms
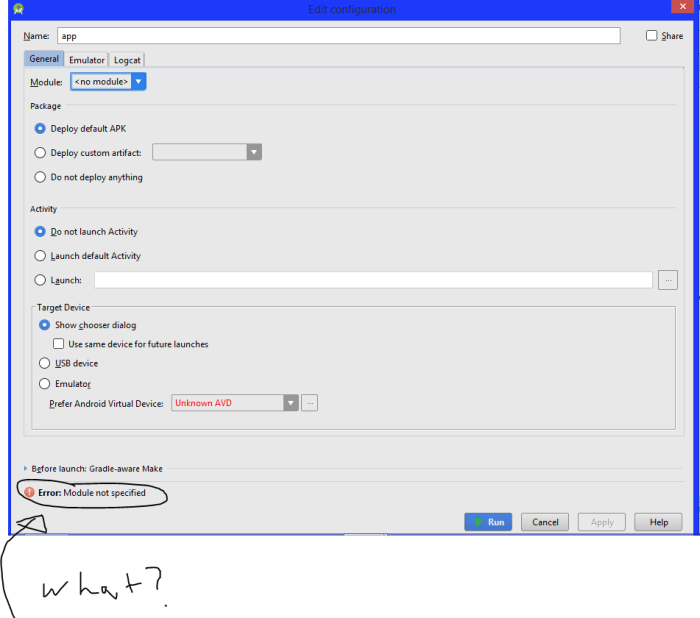
The “module not specified” error in Android Studio is a common roadblock for developers, often arising from issues in project setup or configuration. It essentially tells you that the build system can’t pinpoint the specific module within your project that needs compiling or running. This can lead to a frustrating cycle of errors and delays. Understanding the nuances of this error and its symptoms is crucial for effective troubleshooting.The “module not specified” error stems from a fundamental breakdown in Android Studio’s ability to locate and process the relevant project components.
This often manifests as problems during the build process, and can cascade into other issues, impacting compilation, testing, and even app functionality. This error frequently occurs when the project structure has become misaligned with the expected configurations.
Detailed Explanation of the Error
The core problem revolves around the inability of Android Studio to identify the specific module where the build process should focus. This is a critical piece of information, and its absence often leads to a chain reaction of errors. The compiler needs clear instructions on which part of the project needs attention. Imagine a library with countless books – the error arises when you’re trying to find a specific book but the library system lacks the necessary details to pinpoint its location.
Common Symptoms
A variety of symptoms accompany the “module not specified” error, often appearing as obstacles in the development process.
- Build Failures: The most obvious sign is the build process failing to complete. Error messages might be vague or point to a general problem within the project structure, making it hard to pinpoint the root cause. This can be a significant hindrance, especially in larger projects.
- Compilation Errors: The compiler might struggle to translate the code into executable instructions. This results in specific error messages relating to missing or incompatible files or configurations, often linked to a missing module reference.
- Runtime Crashes: The application might function correctly during development but crash upon installation or during execution on a device. This symptom suggests that the build process hasn’t successfully integrated the necessary modules, leading to a breakdown in runtime functionality. It’s essential to understand the context of the error message for a proper solution.
Variations in Error Messages
The precise wording of the “module not specified” error message can differ across different Android Studio versions. This stems from the continuous evolution of the build system and tooling.
- Different Versions: Older versions might use a more generic error message, while newer versions may provide more context-specific information. Pay close attention to the specific file or path mentioned in the error message to gain valuable clues about the location of the issue.
- Contextual Information: The error message’s context often lies within the project’s file structure. It might refer to a specific module, a particular file within a module, or a dependency missing from the build configuration.
Significance of Project Structure
The project structure plays a vital role in determining whether the build process proceeds correctly. The structure defines how the modules are organized, their dependencies, and how the build system identifies them.
- Module Organization: The way modules are organized within the project is crucial. A well-structured project with clear module boundaries helps the build system understand the relationships between different parts of the codebase.
- Dependencies: Dependencies between modules are also important. The build system needs to understand these dependencies to correctly integrate all components into the final application.
Possible Causes
The “module not specified” error, a common frustration for Android developers, often stems from subtle issues in project configuration. Understanding the potential causes empowers you to swiftly diagnose and resolve these problems. It’s like a detective puzzle, but instead of clues, you have build scripts and project files.The Android build system, while powerful, can be finicky. Slight misconfigurations or missing pieces can lead to this cryptic error.
It’s crucial to approach troubleshooting systematically, examining various aspects of your project structure.
Incorrect Module Paths or Configurations
Incorrect module paths or configurations are a frequent source of the “module not specified” error. The build system relies on accurate paths to locate project components. A misplaced or misspelled path will disrupt the build process, resulting in this error. Double-checking the paths in your project structure and build files is vital. Verify the consistency between the file system and the project’s internal representation of module locations.
Missing or Corrupted Project Files
Missing or corrupted project files can disrupt the build process. Essential build scripts, manifest files, or other project resources might be missing or damaged. This can lead to a cascade of errors, culminating in the “module not specified” error. Regular backups and version control are essential for mitigating this risk. Restoring from a recent backup or recreating the project from scratch can resolve this issue.
Module Dependencies Issues
Module dependencies play a critical role in an Android project. If a dependency is missing, outdated, or has conflicts with other modules, the build system will struggle to integrate them. This can manifest as the “module not specified” error. Ensure that all dependencies are correctly declared in the appropriate build files. Using a dependency management tool like Gradle ensures that versions are consistent and conflicts are minimized.
Build System, Gradle Files, and SDK Configuration Problems
Problems with the project’s build system, Gradle files, or SDK configurations can also cause the “module not specified” error. Inconsistencies in Gradle settings, incorrect SDK versions, or incompatible build tools can all lead to this issue. Carefully review your Gradle files, especially the `build.gradle` files, for any syntax errors or missing configurations. Ensuring that your SDK is up-to-date and compatible with your project’s dependencies is equally important.
Summary of Causes and Symptoms
| Cause | Symptoms | Possible Solutions |
|---|---|---|
| Incorrect Module Path | Error in build.gradle, build process failure | Verify and correct the module path in the project structure and build files. |
| Missing Project Files | Build failure, inability to locate essential files | Restore from a backup or recreate the project from scratch. |
| Module Dependencies Issues | Build failure, dependency conflicts | Verify that all dependencies are correctly declared in the appropriate build files and resolve any conflicts. |
| Build System, Gradle Files, and SDK Configuration Problems | Build failure, build system errors | Review Gradle files for syntax errors and missing configurations. Ensure the SDK is up-to-date and compatible with the project. |
Troubleshooting Steps

Unveiling the mysteries behind the “module not specified” error can feel like navigating a labyrinth. But fear not, intrepid developers! This section provides a structured approach to resolve this common Android Studio predicament, empowering you to swiftly regain your coding flow.
Verifying Module Path
The module path is the crucial address that Android Studio uses to locate your project’s components. A misconfiguration or incorrect path can lead to the dreaded “module not specified” error. Double-checking this path ensures that Android Studio can correctly find the necessary files. Incorrect paths lead to frustrating errors, and a precise path is essential for smooth compilation.
Cleaning and Rebuilding the Project
Cleaning and rebuilding your project is a fundamental troubleshooting step. It forces Android Studio to refresh its understanding of your project structure, potentially resolving inconsistencies and errors. This process ensures that all files are up-to-date and correctly compiled.
Inspecting and Correcting build.gradle Files
The `build.gradle` files act as project blueprints, defining dependencies and configurations. Incorrect configurations in these files can lead to the “module not specified” error. Thoroughly review these files for any typos, missing dependencies, or outdated versions. A meticulous review of these files is crucial for preventing compilation errors.
Re-importing or Syncing the Project, Module not specified android studio
Occasionally, the project might need a fresh start or a sync with the Android SDK. Re-importing the project or syncing it with the latest SDK can resolve discrepancies and refresh the project’s structure in Android Studio. Ensuring your project is up-to-date with the latest SDK is essential to avoid compilation problems.
| Step | Procedure | Expected Outcome |
|---|---|---|
| Verify Module Path | Check the module path in the project structure. Ensure it points to the correct location of your module within the project directory. | Correct path displayed, no errors reported. |
| Clean and Rebuild Project | Use the “Clean Project” and “Rebuild Project” options within Android Studio. This will refresh the project’s dependencies and configurations. | No compilation errors are displayed after rebuilding. |
| Inspect build.gradle Files | Carefully review both the `module:app` and `project` level `build.gradle` files. Look for typos, missing dependencies, or incorrect configurations. | All configurations are accurate and complete. |
| Re-import or Sync Project | Select “File” > “Sync Project with Gradle Files” or re-import the project. Ensure the Android SDK is correctly configured. | Project successfully re-imports or syncs with no errors. |
Project Structure and Configuration
Android Studio projects, like meticulously crafted architectural blueprints, rely on a well-defined structure to ensure smooth functionality and maintainability. A robust project structure simplifies navigation, collaboration, and the management of complex features. This organization fosters a clear understanding of the project’s components and their interdependencies, allowing developers to quickly locate and modify specific parts of the codebase. Understanding this structure is crucial for efficient development and future expansion.A typical Android Studio project is composed of modules, each responsible for a specific feature or part of the application.
These modules work together seamlessly, like well-coordinated team members, to bring the complete application to life. Each module holds the resources, code, and configurations needed for its functionalities. The project’s structure mirrors the application’s architecture, promoting modularity and maintainability.
Understanding the Module Structure
The core of an Android Studio project is the module. A module acts as a self-contained unit, managing its own resources, code, and dependencies. Think of it as a miniature application within the larger project.
Components of a Typical Module
A module typically includes various files and directories. The project structure facilitates efficient management and organization of the project’s code.
- Source Code: This directory houses the Java or Kotlin code that forms the application’s logic. This code interacts with the UI elements and handles the application’s business logic.
- Resources: This directory stores assets like images, layouts, strings, and more. These assets provide the visual and textual content for the application.
- build.gradle file: This file is a cornerstone of the module’s configuration. It defines the module’s dependencies, build process, and other crucial settings. It is like the instruction manual for building the application. Correctly configured build.gradle files ensure smooth build processes, minimizing potential errors.
Managing Dependencies
Dependencies are external libraries or modules that the project relies on. They extend the functionality of the application without requiring you to write all the code from scratch. These dependencies are like specialized tools that enhance the project’s capabilities. Managing dependencies is crucial for maintaining project integrity and compatibility.
- Dependency Management: The `build.gradle` file’s dependencies block lists external libraries required by the project. This section meticulously defines the versions of these libraries, ensuring compatibility and preventing conflicts.
Visual Representation of Project Structure
Imagine a folder containing a main project file. Inside this folder, you’ll find various modules, each with its dedicated source code, resources, and build.gradle file. Each module represents a component of the application, facilitating modularity and maintainability. The project’s structure mirrors the application’s architecture, fostering a clear understanding of the interrelationships between its components.
A diagram showing the project structure would visually represent the hierarchy, highlighting the main project, modules, and the directories within each module.
Practical Examples

Let’s dive into the nitty-gritty of resolving “module not specified” errors. These errors, while seemingly straightforward, can often hide deeper issues within your project structure. We’ll explore practical examples, demonstrating how to spot and fix these problems, focusing on dependency and path mismatches. Imagine this as a troubleshooting toolkit, ready to tackle any module-related mayhem.This section provides concrete examples and solutions to common issues, ensuring a smooth project journey.
By understanding the common pitfalls, you’ll be well-equipped to navigate the complexities of Android Studio projects.
Sample Project Exhibiting the Error
A basic Android project with a module named “myModule” can be created. A simple `MainActivity` in this module would likely be the entry point. However, if the module is not properly referenced or the dependency path is incorrect, the error arises. For example, an incorrect path or missing `build.gradle` configuration in the parent project would manifest as the “module not specified” error.
Recreating and Reconfiguring the Project
To recreate the error, intentionally alter the project structure. For example, rename the module directory, or delete the module’s `build.gradle` file. You might also modify the dependency configuration in the `build.gradle` files, removing necessary dependencies or referencing incorrect ones. This deliberate manipulation demonstrates the conditions that trigger the error. Reconfiguration involves correcting the problematic directory structure, ensuring the correct `build.gradle` files exist and contain the necessary dependencies, and confirming the correct paths in the project configuration.
Resolving Dependency Issues
Dependency issues are frequent culprits. Incorrect or missing dependencies can lead to a “module not specified” error. In this scenario, ensuring the `build.gradle` file for both the module and the parent project accurately defines and imports necessary libraries is crucial. Verify that the correct versions are specified and the dependencies are properly resolved. This includes checking that the declared dependencies are available in the repositories specified in the `build.gradle` file.
Resolving Incorrect Module Paths
Incorrect module paths, particularly in the project’s `build.gradle` file, cause problems. Ensure that the path to the module within the parent project’s `build.gradle` file is correct and reflects the module’s actual location on your file system. Verify that the module’s name and the referenced module name match in both the parent and module-level `build.gradle` files. These paths should be meticulously reviewed and confirmed for accuracy to avoid the “module not specified” error.
Project Structure Examples
| Project Structure | Error Present? | Explanation |
|---|---|---|
| Correct module path, accurate dependencies | No | The project builds successfully. |
| Incorrect module path | Yes | The module is not found, leading to the error. |
| Missing dependency | Yes | The project cannot compile due to missing libraries. |
| Incorrect dependency version | Yes | The specified dependency version may be incompatible with the project’s requirements. |
A well-structured project, with correct paths and dependencies, avoids the “module not specified” error. A meticulous approach to project structure and dependency management minimizes these issues, ensuring a smooth development experience.
Advanced Scenarios: Module Not Specified Android Studio
Navigating complex project structures and dependencies is a common challenge in Android development. This section delves into advanced scenarios, providing strategies for troubleshooting issues arising from intricate configurations and external library interactions. Understanding these situations empowers developers to tackle complex problems with confidence and efficiency.External libraries often introduce dependencies, and conflicts between different versions can lead to unexpected behavior.
Unforeseen conflicts in dependencies can lead to the module not loading or initializing correctly. Knowing how to manage and resolve these conflicts is crucial for maintaining a stable and functional application. Similarly, intricate project structures with multiple modules can complicate debugging, especially when these modules interact in complex ways.
Complex Project Configurations and Dependencies
Managing numerous modules and their interdependencies is vital in large-scale Android projects. Misconfigurations or conflicts between these modules can result in the error being observed. Understanding the interplay between modules is essential for effective troubleshooting. For example, a module’s dependency on a specific library version might conflict with another module’s requirement for a different version. This can cause compatibility issues and ultimately manifest as the observed error.
Multiple Modules and Their Dependencies
When a project comprises multiple modules, each module may have its own set of dependencies. These dependencies can potentially conflict with each other, causing the module not specified error. Careful management of these dependencies is essential to avoid conflicts. Consider using dependency management tools like Gradle to effectively manage dependencies across multiple modules. This approach allows for consistent versions and prevents conflicts.
For example, a module relying on a specific version of Retrofit might clash with another module using a different version, thus disrupting the build process.
Handling Conflicts and Issues with Library Versions
Conflicts in library versions are a frequent source of issues in Android development. Incompatible versions of libraries can lead to unexpected behaviors and crashes. Using dependency management tools to specify the desired library versions is essential. A comprehensive understanding of library version compatibility is crucial for maintaining project stability. Utilize the Gradle dependency resolution system to manage library versions across all modules and ensure compatibility.
For instance, a change in the Retrofit version in one module may not be compatible with another module, requiring a coordinated update across the project.
Issues with External Libraries
External libraries can introduce unforeseen dependencies that can disrupt the build or operation of the application. The error might stem from incompatibility issues or issues with the external libraries themselves. A thorough understanding of the external libraries used in the project and their compatibility is necessary. Carefully review the documentation of external libraries and ensure that they align with the other components of the project.
For example, an outdated or incorrectly configured external library can lead to conflicts and thus generate the error.
